This post contains affiliate links. Please see our disclosure policy.
Soft Airy 100% Whole Wheat Bread. This Sandwich bread is 100% whole grain, no refined flour and is soft and delicious. Vegan Recipe Jump to Recipe

A good sandwich bread is a like a dream. Soft, airy, gorgeous crumb, all whole grain, no unknown additives, dough conditioners and most importantly great tasting. Now the last part is the most difficult of the lot.
Most whole grain or grain and seed breads from the market fall a bit short on the taste factor. I don’t know what they do, but the breads are just too sweet tasting and generally have an odd after taste. And they never work out great to make sweet or savory french toasts (they get so soggy). Its not like they make great sandwiches. Grill them, and taste cardboard. On the other hand some of the artisan style breads dislike my teeth. I mean can you ever bite into them without breaking something!
Or maybe I am too finicky. :). Anywho, some of those problems are non-existent with this gorgeous loaf of bread. This bread has just 3 main ingredients, whole wheat flour, water, yeast! No other flour. And it is soft and delicious! And not dense.
Makes perfect sandwiches and french toasts. I add lemon juice and cumin to change up the flavor a bit from the earthy wheat. Try it. Add orange juice instead of lemon. You can add some vital wheat gluten so the bread doesnt make too many crumbs when sliced.
Make this 100% Whole Wheat Bread !
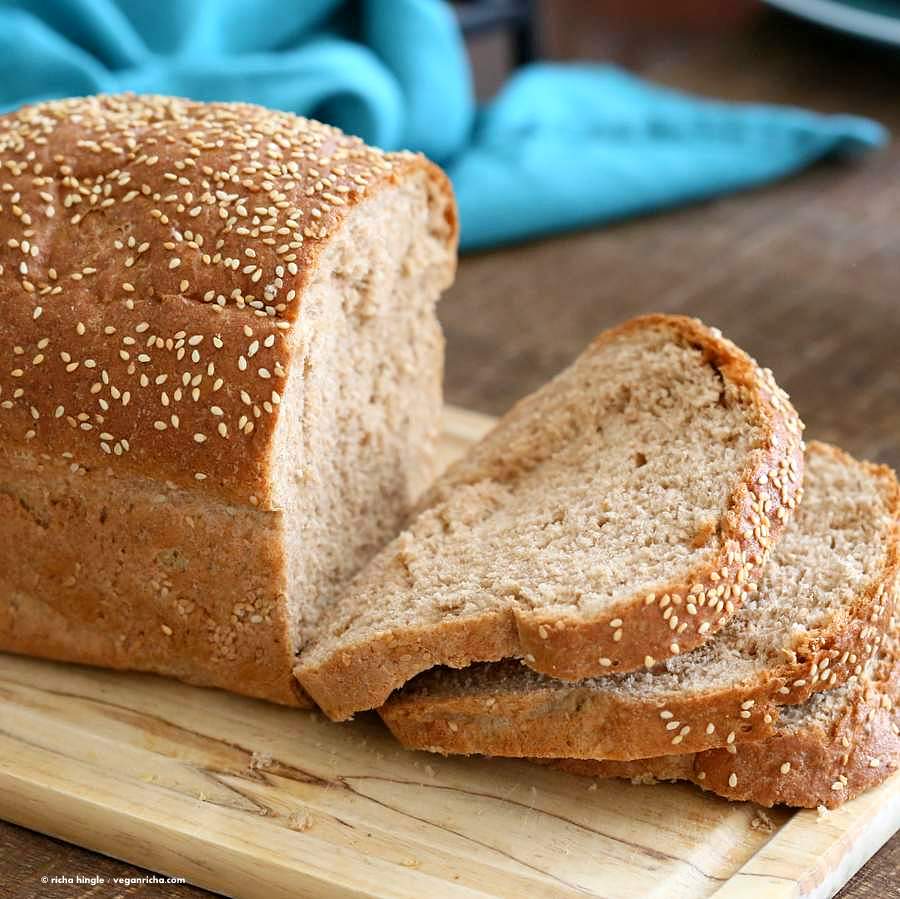
Look at those slices!
More Sandwich loafs from the blog
- Whole Grain Seed Bread Recipe
- White Bean Sandwich Bread Loaf. Vegan Recipe
- Vegan Sprouted Wheat Millet Sandwich Bread Recipe
- Strawberry Sandwich Loaf. GF V

Steps Pictures: Scroll below for recipe.
Make the sponge mixture (see recipe instructions below). Let it sit for an hour. Knead with the rest of the flour. Press the dough into a rectangle, fold the edges. Then fold into a jelly roll. Place in bread pan.
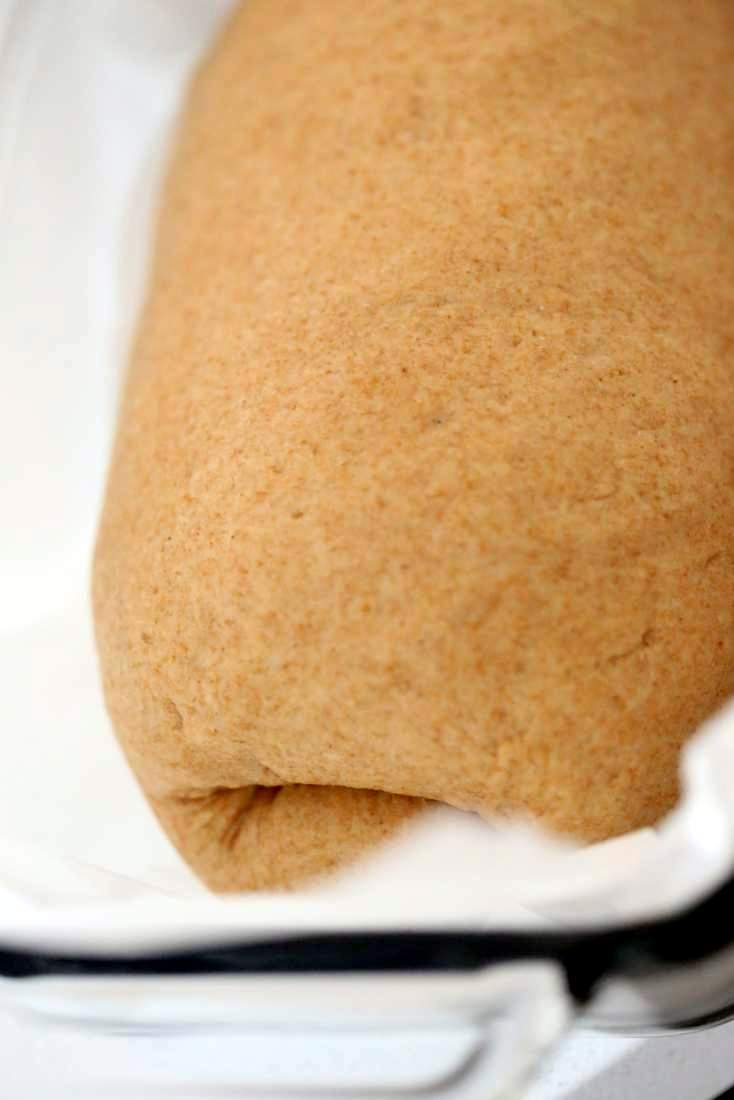
Spray water on top, sprinkle sesame seeds or oats, spray water again. Cover with a towel and let rise.

Once the roll doubles or rises well above the pan edge, bake.

Remove from the pan after 10 minutes. Then cool completely before slicing with a serrated knife. Adapted from Dave’s Whole wheat bread.

100% Whole Wheat Bread Recipe

Ingredients
Sponge:
- 1 cup whole wheat flour
- 1 cup warm water
- 2.5 tbsp maple syrup or other sweetener of choice
- 3 teaspoon active yeast, (2.25 tsp works as well if it’s new strong yeast)
Bread:
- 2 cups whole wheat flour
- 1 tsp salt
- 2 tbsp oil
- 1 to 1.5 tsp lemon or lime juice
- 1/4 tsp ground cumin
- 2 tbsp water
- oil or vegan butter as needed.
Instructions
- Mix the ingredients under Sponge in a bowl. Mix for 2 to 3 minutes until a smooth batter and you can feel the gluten forming. It will start to get a bit stringy
- Let the bowl sit for 1 hour in a warm place. (Use a large bowl as the sponge will triple)
- In a stand mixer, add the sponge. Mix the salt into the 2 cups flour and add the flour to the stand mixer. Start kneading. Add in the oil, cumin, lemon juice and water and continue to knead for 5 minutes. Let the dough rest for 5 minutes. Check the dough to see if it needs more flour or water (it should be soft and smooth. not stiff and not sticky). Add more water if needed. .
- Knead for another 5 to 8 minutes. The dough should not break immediately when a small portion is pulled out. (I knead at setting 2 on my kitchen aid). You can let the dough rest for 15-20 minutes at this point.
- Shape the dough into a fat 9 by 5 rectangle. Fold in the 5 inch side. then roll the longer side like a jelly roll. Seal by pinching. Roll the log a little to even it out in thickness. Place in the parchment lined or well greased bread pan (9 by 5 inch). Spray water on top. Sprinkle sesame seeds or oats. Spray water again. Cover with a towel and let rise for 50 minutes to an hour or until it doubles or the bread domes over the pan edge. (You want to give the bread enough time to rise and get airy. the time depends on the ambient temperature.)Spray water, then spray oil on the top.
- Pre-heat the oven to 350 degrees F / 180ºc. Bake the bread for 40 minutes.
- Remove the bread pan from the oven and brush oil or vegan butter on top. Remove the bread from the pan after 5 to 10 minutes. Let it cool completely before slicing with a serrated knife.
- Store in a bread container on the counter for upto 2 days or refrigerate for upto a week.
Notes
Add 2 tsp molasses for deeper flavor and color.
Add 2 tbsp orange juice instead of water and omit lemon juice.
Note: If using other flours like white whole wheat flour or chapati atta, you might need a bit more or less water.
If kneading by hand. Knead a few minutes longer. Throw the dough onto the counter a few times between kneading to help with the gluten formation. Nutritional values base on one serving
Nutrition
Nutrition information is automatically calculated, so should only be used as an approximation.
Troubleshoot:
If the bread dough rises well before baking and the dome falls during baking:
- The dough got over proofed / over risen. Depending on the ambient temp in the kitchen or wherever you leave the bread to rise you might need less time for the bread dough in the loaf to rise to just about double the original dough size. Anything more than double means the bread is over rising and the gluten will not be able to hold the dome eventually.
- Too much moisture. If the dough is too sticky and has too much moisture, the bread will rise but the dome will be too wet to hold its shape during baking
- bread dough was not kneaded enough. Any of the above issues (in small amounts i.e slightly over risen, slightly over moist) can be handled by the gluten if the bread was kneaded enough to form the gluten well. You want to knead the bread till it is smooth (at least 5 to 7 minutes) and when you pull the dough apart, it doesn’t just break off, but gets elastic before breaking.
If the bread dough does not rise much
- The yeast is old or died somewhere in the steps. Too hot water or salt directly added to the yeast will kill the yeast.
- Ambient temperature was too cold. Yeast activity slows in cooler temperature. Let the bread sit for longer time until it is just about double the original dough size before baking.
- Bread dough was too stiff/had less moisture. Spritz water on the dough every 10 minutes during rising to incorporate some moisture and let the dough rise for longer time until it is almost double.
For Softer, more moist bread, add a bit more oil. Let the dough rise for half an hour before shaping into a loaf. Knead the dough really well for good gluten formation, which will help hold the bread structure with more air.


This is the best whole wheat bread I’ve ever made. I’ve never tried the sponge method before. It turned out so soft and spongy, and not bitter. This is my new go-to bread recipe! Thank you so much.
You just made me smile! Thank you for sharing.
I made this bread, tonight. Keeping in mind that I could count on one hand how many times I have made bread, It’s amazing it came out so well. The texture is light; a feat I have never before accomplished with whole wheat bread. Certain that it couldn’t possibly taste as good as it looks, I was downright gleeful when I tasted it smeared with fruit spread. This is excellent, Richa! Thank you!
So happy it worked out!
Hello Richa. I think most recipes call for letting the dough rise before shaping, but you shape the dough before letting it rise. May I know the reason why?
In step 4 I let the dough rest for 20 minutes then I shape it.
I know it’s late but can I use Instant Yeast & in what measurement?
yes, same amount should work.
I just made this recipe and it was soft and the flavor was very nice. I have made other whole wheat breads before, but was looking for one that I could olive oil in instead of butter, to be healthier, and this definitely did the trick! However, the bread didn’t rise as much as the other one I have used with butter. The butter recipe has 3 total rises. Would this one rise more before baking if I did the first rise (proofing of the sponge), kneaded it and then let it rise again for 1-2hrs, then rolled it out and let it rise in the pan for an hour. Or do you think that would overproof it.
You could try three rises. Or you can just let the bread rise longer in the second rise. The ambient temperature in the yeast, and all that matter in how much the bread rises. Once it has risen well then put it to bake
This is now my weekly bread recipe. It is perfect.
Awesome!
Do you use fresh milled wheat or a bag of flour from the store? I can’t wait to try this!
I use a bag of flour from the store.